After a 5-year existence of the internal JIDOKA Tools page, it was time to give it a new look. The Tools page has been developed to create a repository for all the tools we use within JIDOKA. Tools such as our internal resume app, timesheet apps, Jira, Confluence and so on are placed within this page. In the beginning the layout was not that bad as we didn’t use many tools yet, but over the years this page was expanded with new tools, so that the overview was somewhat lost. The goal of this redesign is that we can add / remove new tools very flexible and easily in the future without having to adjust too much to this page.
Time for a makeover
Besides the lost overview, the design was completely outdated, and not even responsive for mobile devices. This urgently had to change so that our colleagues can easily find an internal tool on their smartphone.
The new design must be fresh, flexible and within the JIDOKA corporate identity. The latter in itself was not a problem because we have already given various internal tools in a JIDOKA look. It was important that we had to take into account that the data is collected from another place. You must therefore make sure that you do not make too many custom adjustments to certain elements within your design, such as making a certain logo larger or smaller, adjusting text in font-size and so on. With this design you have to take into account that you can extend one particular styling to every element.
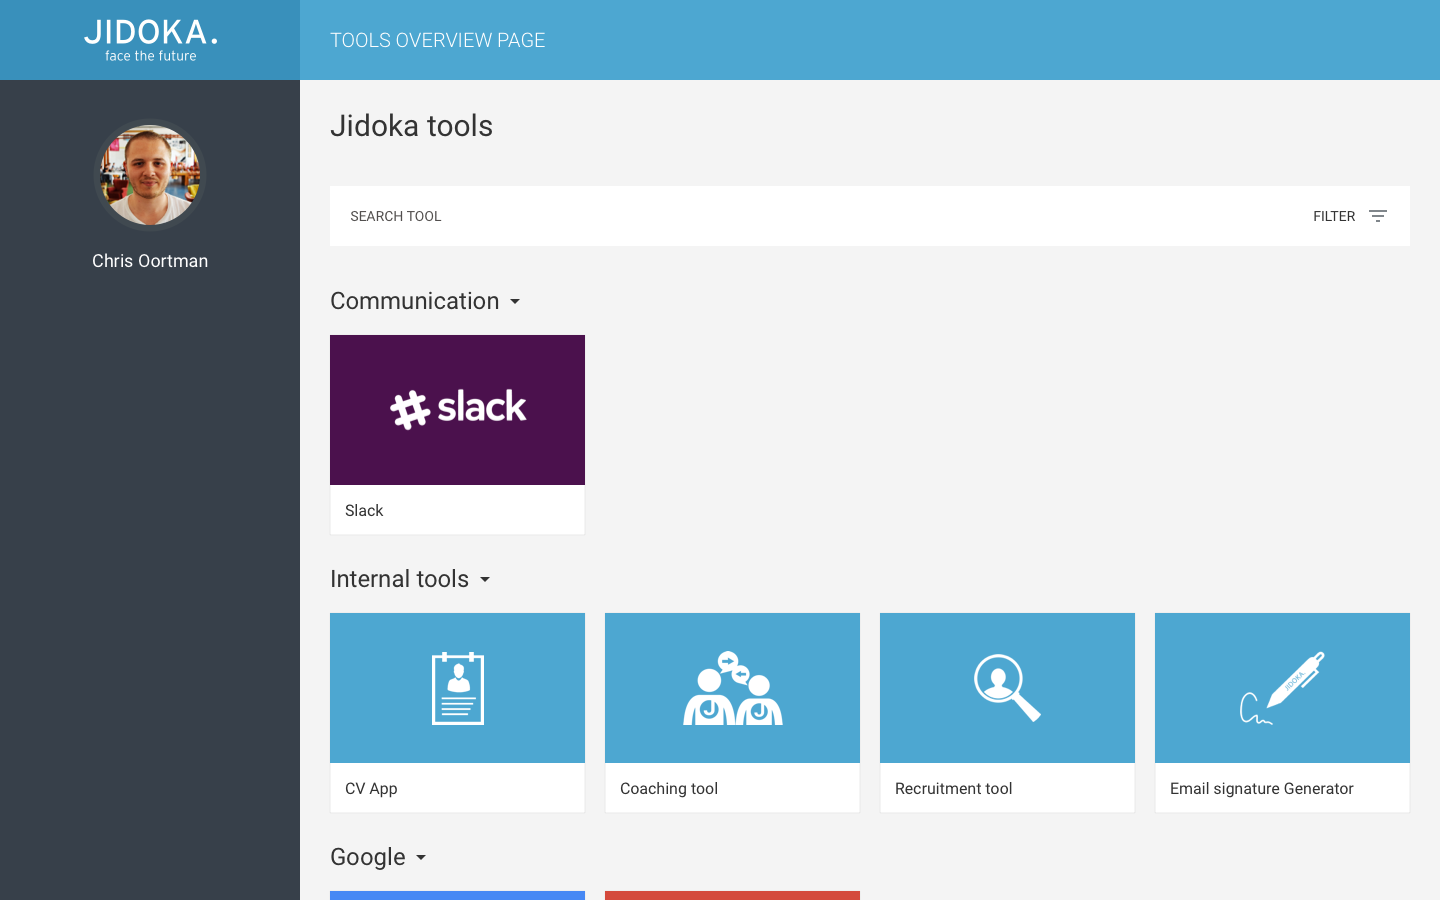
In the end, the choice was simple, a flexible grid system where every grid element will have the same styling, regardless of the size of the logo or the length of the tool name. In the example below, it was already taken into account, for example, to retrieve user details via Keycloak, divide tools by category and apply filters.
Creating the new guise
In the end we had to make some sacrifices and we started to update this tools page in phases. During the first phase we will ensure that we can display all tools easily and flexibly on the page. For the time being, we will not divide the tools into categories and we will omit filters.
In terms of implementation, we have reused the existing infrastructure. It was not immediately necessary to throw a frontend framework against it for an onepager. In this case, a static html page was developed once again, but thoroughly cleaned up.
A neat trick for developing a CSS grid without having to add mediaqueries to determine the number of columns per breakpoint is to play with auto-fill within your grid-template-columns.
.tools {
 &__container {
   display: grid;
   grid-template-columns: repeat(auto-fill, minmax(245px, 1fr));
   grid-gap: 20px;
 }
}
By adding minmax(245px, 1fr) your CSS grid will ensure that columns are automatically generated as long as there is at least 245px space to add a column. The auto-fill attribute will ensure that the entire container will be filled with columns as long as there is enough space. In fact, with one line of code you immediately created a responsive grid system without having to enter a specific breakpoint. For example, on mobile you will only see one column with all the tools under each other.
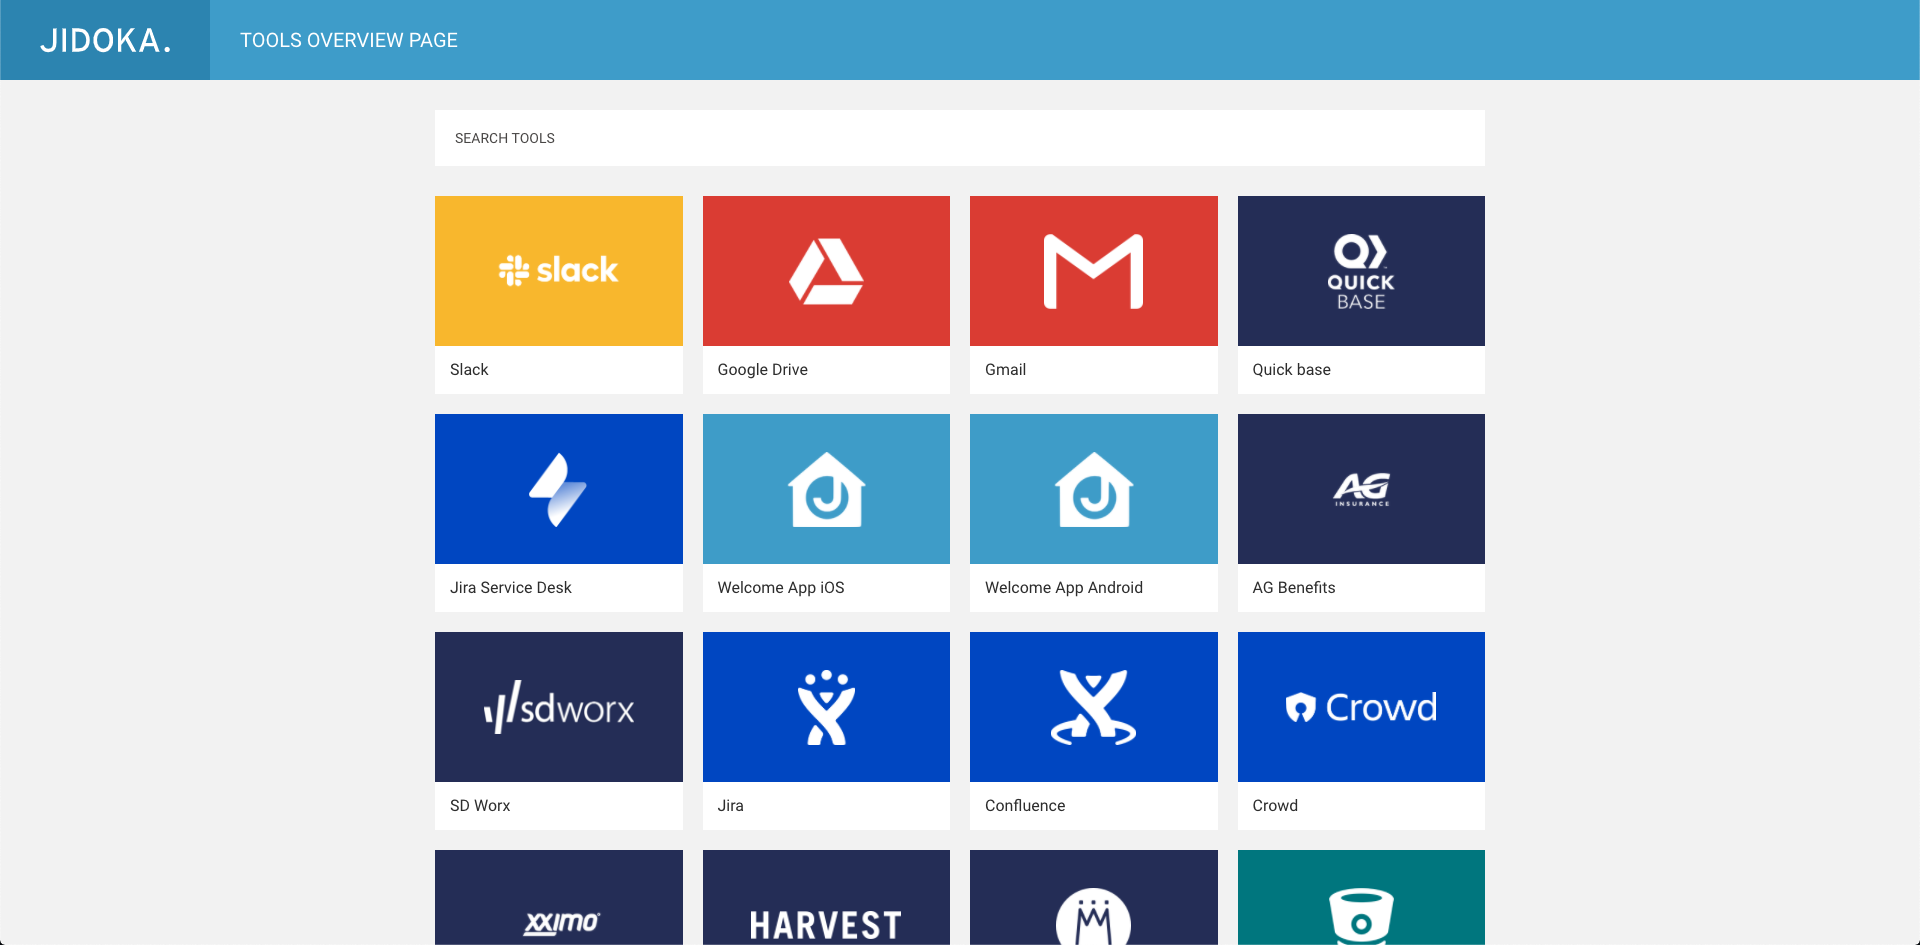
Finally, a simple search function was written. Because new tools will be added the whole time, it will be a bit more difficult to find your tool within the page. Because the description of a tool was also available (but not shown), you can use the search field to search after the name as well as the description.
searchField.addEventListener('keyup', (e) => {
   const searchString = e.target.value.toLowerCase();

   const filteredTools = tools.filter((tool) => {
       return (
           tool.name.toLowerCase().includes(searchString) ||
           tool.description.toLowerCase().includes(searchString)
       );
   });
   displayTools(filteredTools);
});

const displayTools = (tools) => {
   toolsContainer.innerHTML = tools
       .map((tool) => {
           return `
           <a href="${tool.link}" class="tools__block">
               <div style="background: ${displayColor(tool.category)}" class="tools__image">
                   <img src="assets/images/${tool.name.split(" ").join("-").toLowerCase()}.png" alt="${tool.name} logo" class="tools__logo">
               </div>
               <div class="tools__name">
                   ${tool.name}
               </div>
           </a>
       `;
       })
       .join('');
};
Behind the scenes
The idea behind the revamp of the Tools page was to not only attack the outdated frontend, but to also improve everything that runs behind the scenes. We took the opportunity to boost areas such as security, efficiency & stability of the app. Part of those improvements come from the app now being hosted on a Kubernetes cluster. The reasoning behind this move is to make use of the already configured monitoring, logging & security solutions.
KISS
Now that we have found a solid environment for the tool to operate on, we still needed to figure out the inner workings of the Tools page. These were the requirements from where we needed to start our journey:
- The final solution needs to be lightweight
- Contain only the bare dependencies
- Have as few technical constraints as possible
- KISS
The average developer reading this can only dream of these requirements. Rest assured, these in fact do exist in reality. Starting from these pointers, we began researching a solution to store the data of the Tools page. Storage persistence was key and if we could reuse an existing setup, that would give even more bonus points. We stumbled upon Quickbase. Probably not the most sexy solution out there but it does contain everything we need. A low level application platform which offers a simple relational database, ready for use. Quickly, we defined a straightforward structure for the tool data and in minutes we had a datasource which was ready for testing.
Gravitee explained, sort of…
Because the data in Quickbase doesn’t need frequent access, we chose to develop the app in a way where it performs an API call to Quickbase to retrieve the necessary data & use it to generate the correct tool selection in the frontend. This approach did raise some questions about security. Here is where Gravitee comes to play. Gravitee is an open-source API management platform which contains a great amount of features to secure & publish APIs. Some of our other internal JIDOKA tools make use of Gravitee so we already knew a thing or two about integrating it in our current setup. A crucial part of interacting with the Quickbase API, is to pass 2 specific headers. One of them is the Quickbase Realm Hostname header whilst the other one is the Authorization header which contains a Quickbase User token.
This data is quite sensitive so with the use of Gravitee API policies, we defined a structure which would append those headers on requests to the Gravitee API and pass it through to the Quickbase API.
With everything set-up, we changed the flow of the Quickbase request to take a small detour through Gravitee, and eureka! We struck gold, we got a response from Quickbase containing all of the tools which we defined earlier, only the structure of the response was messy to say the least.
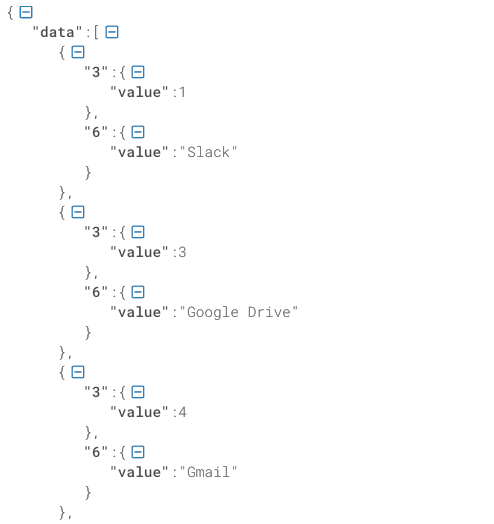
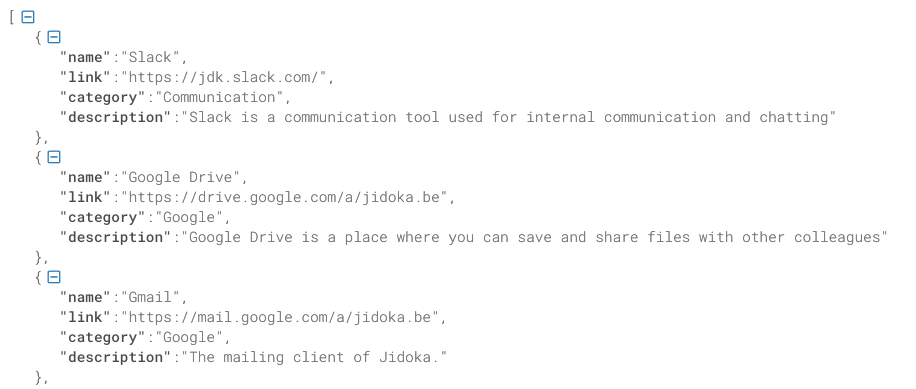
Extracting the necessary tool data out of this JSON would be a bit painful, thankfully Gravitee can help us out here as well. Using the JSON to JSON transformation policy on the Quickbase response, we can form the JSON to our liking using the JOLT library. A quick read through the documentation combined with some tinkering, resulted in a JOLT specification which would form our messy response into a beautiful JSON array.
You would think that we reached endgame here but we decided to take it a bit further.
We here at JIDOKA love automation. We love it so much that even the name JIDOKA, means “Automation with a human touch”. This project couldn’t be released without some automation in play, right?
If you like pina coladas
Adding or editing existing tools in Quickbase quickly became a bit tedious. There must be something out there that we could use to dynamically sync our tool data with Quickbase. Then it hit us, most of our tools run on Kubernetes. If we could find a solution to extract the existing tool data from Kubernetes and manufacture it into a Quickbase query request, we could sync the tool data with Quickbase automatically. Only thing left for us would be to sit back, and watch it all unfold whilst sipping on piña coladas.
After some Groovy & Kubectl magic, we managed to set up some Jenkins jobs to add a tool, delete a tool and sync all of the tools to Quickbase. Kubectl is used behind the scenes to extract tool data such as names, descriptions and categories. This tool data is stored by using annotations and labels on existing Kubernetes deployments.

The tool data is then used to construct a query request towards Quickbase to upsert the tools if necessary. The same logic goes behind the Add & Delete a tool jobs, only here we acquire the data from Jenkins parameters which the user provides and send the correct query request afterwards.
This project might have seemed quite simple at first glance but turned out to be an adventure of itself. The various workarounds and tweaks forced us to stretch our imagination but resulted eventually in a neat little tool.
What will the future hold?
As mentioned earlier, we will develop this tools page in stages. One of the next steps is to link our internal Keycloak to this page. As a result, all tools are protected behind our personal login, and it is easier to log in within a tool since you were logged in earlier when opening this page.
Finally, we’ll look at converting this page into an Electron app. For example, every employee has a desktop app that gives them immediate access to every tool!
More later!